
PostgreSQL To VSC Connection
Introduction
While the pgAdmin tool works when interacting with the remote database server, it can speed up development and testing if SQL can be tested within VSC. This document explains the setup process.
SQLTools Extension
In order to begin, you will need to install the SQLTools extension and the SQLTools PostgreSQL Driver.
- Click the VSC extensions tool in the side bar.
- Type "
SQLTools" into the search bar at the top of the extensions panel. - The correct extension is by Matheus Teixeira. Click "Install".
- If required, reload VSC to activate the extension.
- A new icon will appear in the tools side bar:

The Connection String
Hopefully you will recall that when you were connecting pgAdmin to the remote database, you had to copy and then manipulate the connection string provided to you in the Render.com database connections information. You are going to need that connection string again.
- Login to Render.com using your GitHub credentials.
- Click the PostgreSQL service in the Dashboard.
- Scroll down to the "Connections" area of the Info screen.
- Click the "Copy to clipboard" icon for the "External Database URL".
- Leave this browser window open as you'll need it again shortly.
Add New Connection
- Return to VSC.
- Click the SQLTools icon.
- In the new panel, click the "Add New Connection" button.
- A new settings tab will appear and should list connection drivers to different databases.
- If the PostgreSQL driver icon is present, click it:

- If the icon is NOT present, click the "
Get more drivers" link.- The extension's panel will open.
- Locate the "SQLTools PostgreSQL/Cockroach Driver" extension and click it.
- Install this driver.
- Once the driver is installed, click the PostgreSQL driver icon.
- The second "connection assistant" setting window will load:
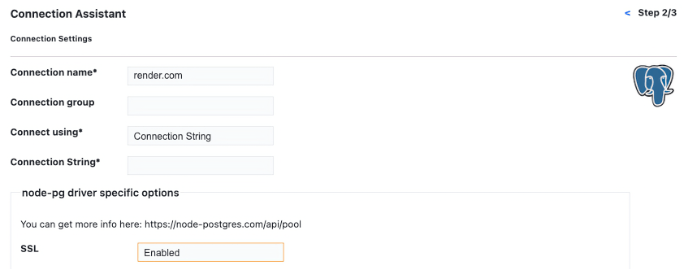
- Give the connection a meaningful name (e.g. render.com).
- Change the "Connect Using:" option to "Connection String".
- Paste the copied External Database URL connection string into the "Connection String" text box.
- Change the "SSL" setting to "Enabled".
- In the SSL option list, turn on the checkbox to the right of the "rejectUnauthorized" option.
- Scroll to the bottom of the page and click the "Test Connection" button (on the right side).
- Hopefully, a green "Successfully connected" message will appear on the left, above the "Save Connection" button.
- If the connection was successful, click the "Save Connection" button.
- A confirmation screen will appear showing the data that you entered that is being used for the connection.
- Click "Connect Now".
- The command palette will open, and you will have to enter the password again, then press "Enter".
- You are now connected to the database server and a new SQL tab should open where you can write SQL queries to interact with the database.
Using the Connection
- Click the SQLTools extension icon.
- The active connection should appear at the top of the panel.
- Click the icons to expand the items until the three tables are visible.
- Right-click either the "classification" or "inventory" table and select "Show Table Records".
- A new tab should open showing you the field names and all records of data from the table.
- Click the "+" sign next to one of the tables.
- A new INSERT query will appear in the SQL tab. This is a generic query, where you will need to provide the actual data, but the field names and SQL structure are present.
- Feel free to play around, but be careful to not change the database or table structure.
- When done, hover over the render.com connection and click the "Disconnect" icon on the right.
- Close the sql tabs that you had open.