
PostgreSQL Tables
Introduction
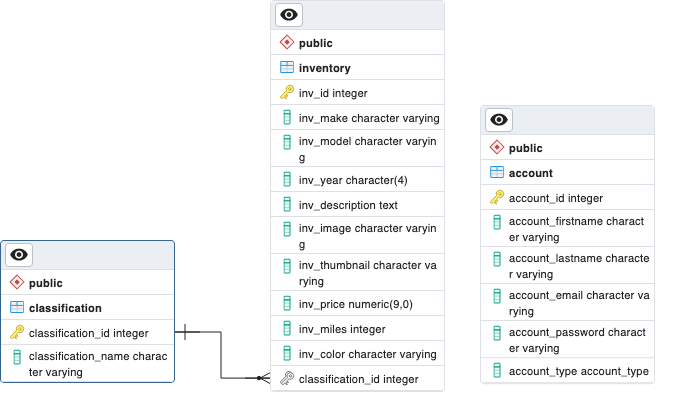
We're now ready to create the tables for the database. You'll create three: classification, account, and inventory. The tables, their fields and types, and the relationship between the classification and inventory tables are shown in the Entity Relationship Diagram (ERD).
Important: When creating tables and fields, make all names LOWERCASE, SINGULAR, and use NO SPACES. This is best practice and will make writing SQL code much easier for you.
Video Demonstration
The video provides a general overview of the activity, but does not contain the detail needed to complete each process. Watch the video to obtain a general idea, but follow the written steps to complete the activity. This is the Transcript of the video.
Data Type
In your reading, you may remember that when creating a field to store string data, the data type is typically
"VARCHAR". However, as you create the tables below, you'll see
"character varying" instead. The latter is a PostgreSQL convention. You'll also
notice that a size is not declared with "character varying"; whereas it normally is
included when using VARCHAR (e.g. VARCHAR(55)). It
is worth noting that the PostgreSQL server understands and will work with both.
Classification Table
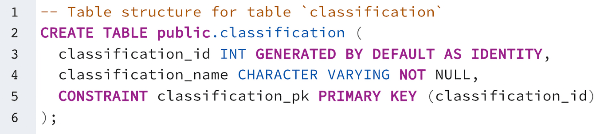
Inventory items (vehicles) fall into classifications: sedans, sports, SUV, utility, truck, etc... The classification table will contain fields to store vehicle classifications by name and unique id. As you did previously, use pgAdmin as the tool to interact with the database on Render.com.
- Launch pgAdmin and enter the master password.
- Expand the Servers list (if needed)
- Right-click on the Render connection
- Select "Connect to Server"
- Expand the "Databases" item.
- Expand the 340 database item (you named this item).
- Expand the "Schemas" item.
- Expand the "public" schema item.
- Right-click on the "Tables" item, select "Query Tool".
- A new work window will open where SQL code is expected to be entered.
- Type the code shown below into the window:
- Double check that the code is typed correctly and that there are no errors or warnings being indicated by pgAdmin.
- Copy the code and paste it into the VSC SQL file that holds the code to create the PostgreSQL Type from the last activity. Save and close the file when done.
- Click the "Execute / Refresh" icon in pgAdmin.
- The code should run and a new "classification" table should appear in the "Tables" item of the database. If the table does not appear, right-click on the Tables item, and select "Refresh". Do this after each table is created if the table does not appear in the list.
- Close the pgAdmin query window and don't save the changes.
Inventory Table
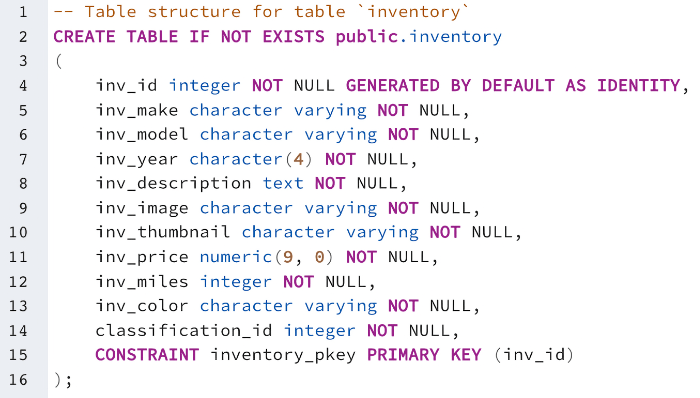
Next, you'll create the inventory table. Referring back to the ERD provided earlier, you can see that it has many more fields, but also it has a field (classification_id) that has a relationship back to the "classification" table. This means, that when adding a new vehicle to the inventory table, it must contain a value that already exists in the "classification" table.
- It is assumed that the connection between pgAdmin and the remote database is active and that the server items are expanded.
- Right-click on the "Tables" item, select "Query Tool".
- A new work window will open where SQL code is expected to be entered.
- Type the code shown below into the window:
- Double check that the code is typed correctly and that there are no errors or warnings being indicated by pgAdmin.
- Copy the code and paste it into the VSC SQL file that holds the code to create the PostgreSQL Type and classification table from earlier. Save and close the file when done.
- Click the "Execute / Refresh" icon in pgAdmin.
- The code should run and a new "inventory" table should appear in the "Tables" item of the database.
- Close the pgAdmin query window and don't save the changes.
Create the Classification and Inventory Relationship
With the "classification" and "inventory" tables created, and the fields needed for the relationship existing (classification_id) in both tables, the relationship can be created. Note: While the field names do not have to match (although it is clearer when they do) in both tables, their data types and other defining characteristics must. You'll notice that in our tables, the names are the same, they are both "integer" data types and both are "NOT NULL", meaning that they must have a value. This is required in order to create relationships between tables!
- It is assumed that the connection between pgAdmin and the remote database is active and that the server items are expanded.
- Right-click on the "Tables" item, select "Query Tool".
- A new work window will open where SQL code is expected to be entered.
- Type the code shown below into the window:

- Double check that the code is typed correctly and that there are no errors or warnings being indicated by pgAdmin.
- Copy the code and paste it into the VSC SQL file that holds the code to create the PostgreSQL Type and tables from earlier. Order matters! Make sure the order of the code is: 1) create the type at the top, 2) create the classification table next, 3) create the inventory table third, and 4) create the relationship at the bottom. Close the file when done.
- Click the "Execute / Refresh" icon in pgAdmin.
- The code should run. No new table will appear, but the relationship should have been created.
- To confirm this:
- Right-click either the "classification" or "inventory" table.
- Select "ERD for Table" from the options shown.
- pgAdmin should create an ERD that shows both tables and the relationship between them. Refer back to the ERD shown above to see what the relationship looks like.
- Close the ERD window. Don't save the changes.
Create the Account Table
The final table is the "account" table. As the name suggests, it will hold information about the people who register with the application. Note that an account in this table represents a "client", who is any person - random visitor or an employee of any level. We will have to create a means of differentiating them later.
- It is assumed that the connection between pgAdmin and the remote database is still active, and the server items are expanded.
- Right-click on the "Tables" item, select "Query Tool".
- A new work window will open where SQL code is expected to be entered.
- Type the code shown below into the window:
-- Table structure for table `account`
CREATE TABLE IF NOT EXISTS public.account
(
    account_id integer NOT NULL GENERATED BY DEFAULT AS IDENTITY,
    account_firstname character varying NOT NULL,
    account_lastname character varying NOT NULL,
    account_email character varying NOT NULL,
    account_password character varying NOT NULL,
    account_type account_type NOT NULL DEFAULT 'Client'::account_type,
    CONSTRAINT account_pkey PRIMARY KEY (account_id)
);- Double check that the code is typed correctly and that there are no errors or warnings being indicated by pgAdmin.
- Copy the code and paste it into the VSC SQL file that holds the code to create the PostgreSQL Type and tables from earlier. Order matters! Make sure the order of the code is: 1) create the type at the top, 2) create the classification table next, 3) create the inventory table third, and 4) create the relationship next, and 5) create the account table at the bottom. Close the file when done.
- Click the "Execute / Refresh" icon in pgAdmin.
- The code should run and a new "account" table should appear in the "Tables" item of the database.
- An explanation about line 9 of the code. This line creates a "account_type" field, with the name of "account_type". This is why the type had to be created before the table could be created. It also has a default value of "Client", which is one of the three pre-defined values that the type was given. This means that every record that is stored into this table will have the value of "Client" for this field.
- Close the pgAdmin query window and don't save the changes.
Conclusion
Whew! That was a bit of work. But, let's recap. You have now created the database that the application will use to store data. In addition, you have saved all the code so that when the database is removed in 90 days, it can easily be rebuilt. By storing all the creation code in a VSC SQL file, and in the right order, all you'll have to do is run the entire file's code at the same time and everything will be done in a single step. You should be proud of yourself.
Close the Connection
As stated in previous activities, it is recommended that when you are done with your interaction between pgAdmin and the database server that the connection be closed. To do so:
- Right-click on the Render server object in the "Servers" panel of pgAdmin.
- Select "Disconnect from Server".
- You're done.