
EJS View Engine
The video provides a general overview of the activity, but does not contain the detail needed to complete each process. Watch the video to obtain a general idea, but follow the written steps to complete the activity. This is the Transcript of the video.
The index view shown in this video reflects that view when the assignment at the end of this unit is complete. Yours will NOT look like this during this activity.
Introduction
EJS (Embedded JavaScript) is a node package, known as a view engine. It is used to create views in our application. Associated with it is another package named "express-ejs-layouts". The layouts package allows EJS to use partials and build layouts. Another way of describing this is modularization, which you may already be familiar with. In this activity we will install and implement both packages.
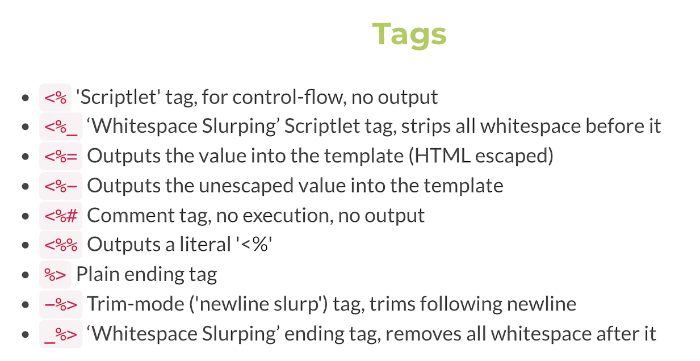
EJS Tags
This image, from the EJS documentation shows the various EJS code blocks and what each annotation means. I suggest you save the image and refer to it or print it as a reference as you work through the code in this and future activities for the course.
Install the packages
If you open the links for EJS and EJS Layouts, you'll find code for doing the installation. However, we are using PnPM as our package manager, so we will alter the command slightly. We will also take advantage of the ability to install more than one package at a time. Follow the steps listed below to accomplish the installation:
- Open a new Terminal if one is not already open.
- Type,
pnpm add ejs express-ejs-layouts, press "Enter". - Wait while the two packages and their dependencies are installed.
- When done, open the package.json file and check that these packages have been added to the dependencies list.
- Close the terminal and the package.json file.
View Engine
With the packages installed, we now need to import them into our application and use them. Part of this use process is to declare EJS as being our "view engine".
- Open the server.js file and find the "Require Statements" section.
- At the end of the line where express is required (line 8), click and hit enter, creating an empty line.
- Add the following code to the empty line:
const expressLayouts = require("express-ejs-layouts"). - Save the file
- Highlight and copy the "Routes" multi-line comment
- Click the empty line above the Routes comment and hit "Enter" twice, creating two empty lines, then paste into the second empty line.
- Alter the comment to be "View Engine and Templates"
- Create three blank lines below the comment block
- Add the following code to the three blank lines:
app.set("view engine", "ejs") app.use(expressLayouts) app.set("layout", "./layouts/layout") // not at views root - Save the file
An explanation
- In step 3 above, we tell the application to require express-ejs-layouts, so it can be used. This follows a simple rule, "You have to have something in order to use it".
- In step 9, line one, we declare that ejs will be the view engine for our application. Built into EJS is the understanding that all views will be stored in a views folder, and that is where EJS will look for all view files.
- Step 9, line 2, like step 3, tells the application to use the express-ejs-layouts package, which has been stored into a "expressLayouts" variable.
- Step 9, line 3, says that when the express ejs layout goes looking for the basic template for a view, it will find it in a layouts folder, and the template will be named layout.
- There are a couple of items to be understood with this code:
- The layout template is expected to be found at the root of the views folder. However, if every view were just dumped at the root, it could be difficult to organize and manage. So, a folder structure will be implemented and views will be stored into folders to impose organization.
- When creating a view file, like any file, it will have a name and extension. However, EJS will always look for files with the extension "ejs", which means that when we declare a file in a path, the extension can be left out. So, EJS will read the path ./layouts/layout and look in the views folder (indicated by the period), then for a subfolder named layouts, then for a file named layout.ejs.
- From this point forward, all dynamic views will be stored in the views folder - typically in a subfolder depending on what part of the application the view belongs or will be used.
Layouts folder and layout.ejs view
It's time to build the folder and view.
- Click the views folder so that it is highlighted
- At the top of the panel will be icons to create new pages, folders, etc...
- Click the new file icon.
- A file icon with a text box will appear in the views folder.
- Type the following
, press "Enter".layouts/layout.ejs - A new folder will be created, and a new file will be created within the folder. This is a VSC shortcut for creating files and folders at the same time. Nifty, huh?!
- The new file should open in the editor. If it doesn't, open it.
Add the Layout Code
Add the code as shown in the image below (do not include the line numbers on the left). As you do so, refer to the EJS documentation for the meanings of the various code blocks as shown in red (<% %>)
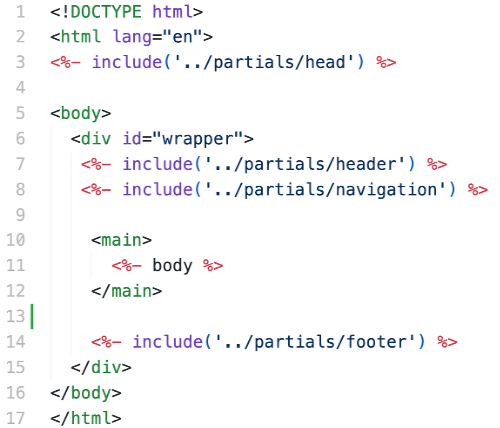
Partials
A partial is what it sounds like, a part of a whole. In this case, each partial represents code for that particular part of the entire finished view. As you look at the layout code you should identify four partials: head, header, navigation and footer. Each of these is indicted as part of an include function. Let's build each of these now.
head Partial
- Let's start by building the head partial along with the partials folder.
- Just like you did previously, click the views folder then create the file and the folder at the same time. Remember that each of these files will end with the "ejs" extension.
- Once the head file is created, add the following code to it (do not include the line numbers on the left):
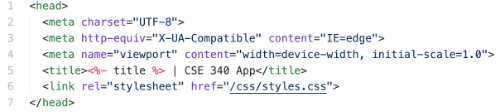
- Everything here should look familiar, except you'll notice that the title contains an EJS code block for a dynamic value and the path for the CSS file does NOT contain the public folder name. Remember that EJS assumes that all static files are automatically inside the public folder.
header Partial
This time, you'll build the partial, but without creating a new folder, since the folder already exists.
- Click the partials folder, then click the new file icon.
- Name the new file header.ejs.
- Add the code shown below to the file:
<header id="top-header"> <span class="siteName"> <a href="/" title="Return to home page">CSE Motors</a> </span> <div id="tools"> <a title="Click to log in" href="/account/login">My Account</a> </div> </header> - The id's and classes used with the elements are for CSS styling and can be altered to fit your preferences.
- While you should understand the difference between the head and header, let me take just a moment and
refresh your memory.
- head - The head is a child of the HTML root element. It contains code intended primarily for the browser, in order to render the view.
- header - The header is an HTML semantic element meant to describe the structure of the content. Specifically, this is the header of the entire view, meant to identify the site as a whole and include, in this case, a tool that will allow the user to access account tools.
navigation Partial
As before, you'll create a new file for the navigation partial in the partials folder.
- Create the navigation partial in the partials folder.
- Enter the code shown in the image:
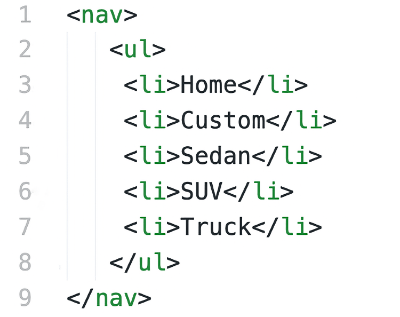
- Impressive, isn't it?!
- For now, this is temporary filler code. It will be replaced with dynamic code shortly.
footer Partial
Finally, let's build the last of our partials.
- Create the new footer file in the partials folder.
- Add the code shown below to the file:
<% const d = new Date()
let year = d.getFullYear() %>
<footer>
  <p class="copyright">& copy ; <%= year %>, CSE 340 App</p>
</footer>- This allows JavaScript to determine the current year, and display it in the copyright statement. This eases maintenance for the site.
- Remember from previous classes that "©" is an HTML entity that will render the copyright symbol in the browser.
- As previously mentioned, the class is for CSS styling and can be altered to fit your needs.
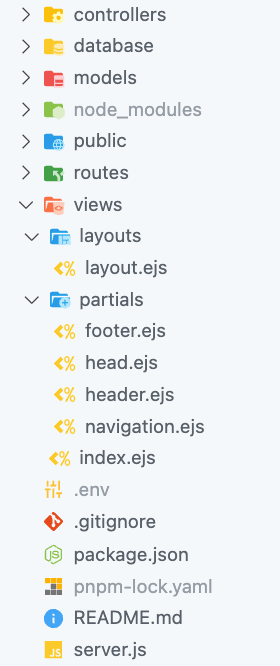
Structure Check
Compare your folder and file structure against the illustration below. If anything is out of place, be sure to correct it.
What about body?
Yep, we skipped the body (line 11) in the layout code. That's because the body is the "content" of the page and will be created as needed to fill in the content when a view is to be generated and delivered. We'll create individual content for this section as we go along.
Conclusion
You may be asking, "Why did we build all of these files?" That is a good question. The answer is largely maintainability. Because each partial will be dynamically injected into a finished view, it means that if we need to make an update to the head, header, navigation or footer, we only have to do it in one place for it to be applied to all views. "One and done!" - pretty handy.
With the layout and partials built, we can now progress to making them do their job.